
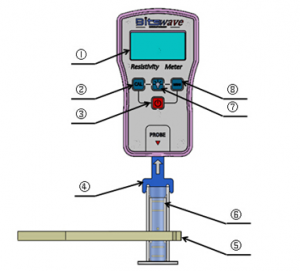
① LCD Display
② Calibration Button
③ Power Button
④ Probe
⑤ Container Wood Clip
⑥ Liquid Container
⑦ Display Brightness
⑧ Measurement Button
The resistivity meter comes calibrated from the factory. To ensure accuracy, we suggest that users calibrate the meter every three months. Please use the standard calibration fluid provided in the original package. The specific calibration procedure is as follows:
- Before calibration, insert the battery
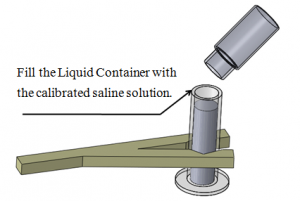
- Fill the liquid container with the saline solution provided in the box
- Connect the meter with the probe via USB connector or USB cable
- Insert the probe into the liquid container filled with the standard saline solution
- Press the power button to turn on the meter. The LCD will display all of the function icons. After one second, the LCD will display the probe connection icon. If the Temperature and the Resistivity read a value of 0.0, the meter is ready to be calibrated.
- Press and hold the Calibration (CAL) button until the LCD displays an 8 second countdown.
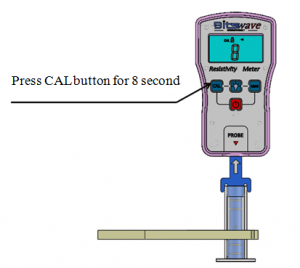
- When the countdown has ended, release the Calibration button. Calibration is completed when you hear the meter “beep”. The LCD will display the current temperature and resistivity value.
- Press the Measurement (MEAS) Button to test the fluid. If the measured values are consistent with the calibration values, then the calibration has been successful. If the values are not consistent, then restart the calibration process at Step 6.
- After the Calibration process has been completed, press and hold the Power Button to turn off the meter.

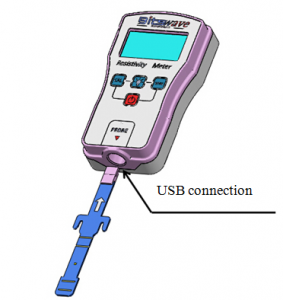

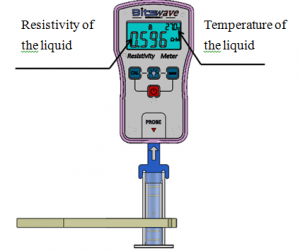
1.Before the meter can be used to measure resistivity, the probe must be connected to the meter. There are two ways to connect the probe to the meter: by direct USB connection or via the USB cable .Insert the resistivity probe into the container filled with liquid.
2.Press the Power Button to turn on the meter and begin measurement.
3.Approximately one second after startup, the LCD will display the probe connection status icon, the temperature and the resistivity value.
4.If the temperature displays 0.0℃ and the resistivity displays 0.000Ω·m, the instrument can be used normally.
Notes
- The on and off time interval of the backlight is at least one second.
- If the meter is to be used at night or in low light conditions, press the Backlight button to turn on the LCD Backlight. Press the Backlight button again to turn off the backlight.
- Press the Measurement button to begin measurement.
- Immediately after the Measurement button has been pressed, the meter will begin an 8 second countdown which will be displayed on the screen. When the meter beeps the values that are displayed will be the current temperature and resistivity of the test liquid. The final values .
Notes
- The container filled with liquid should be placed vertical, and should not be tilted while measuring.
- Read the results after the “Beep” to ensure accurate measurements.
- If the meter is idle for three minutes, the meter will automatically shut-off.
- The Liquid Container and Resistivity Probe may be reused after cleaning. Use a new probe and container for accurate measurements.
